Video Chat Plugin
Video Chat Plugin for Websites
<script id="connexense_js" plugin_id="$xXxXxXxX" onload="setTimeout(()=>{connexense.addConnexense()},500)" src="https://connexense.com/plugin/plugin_min.js"></script>
Connect with your customers!
Connexense video chat on your website enables you to connect with customers, clients and contacts like never before. Know-your-customer, and let them know you!
Use any webcam connected to your computer, switch cams mid-stream if you need to, and use the screen-sharing feature to present documents, diagrams or images in other tabs or windows to bring your website visitors inside your showroom, your office or workshop.
 The widget can be deployed on any webpage - or multiple pages - on any website. It provides a private one-to-one video call with text chat and can be viewed small (default), medium (half-screen) or full-screen.
Configure your video chat plugin
Go to the Connexense home page and make an Account, then log in.
Click the menu icon at top-right and choose Account Settings. Scroll down to the Website Plugin section.
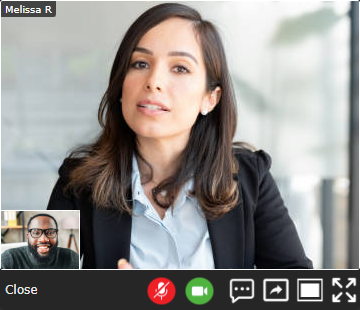
Enter your website domain name, your preferred screen-name (like "Melissa R" in the image above) and the text to display in the video call button (like "Call Connexense Support" in the button on this page).
When you're ready, click the Activate Your Server button.
Your HTML <script> tag with your plugin_id will be displayed. Copy it and paste it into your webpage - you can start using it right away.
Placement on the page
(All the javascript code which constructs the widget HTML and CSS plus all its functions is contained within an object named "connexense" so it will not interfere with any other code on your webpage).
The plugin HTML element - id="connexense_plugin" - uses css "position:absolute; top:0; left:calc(50% - 180px); width:360px; z-index:1000000", so it appears at the top of, and centered in, its parent element. The start button - "height:28px; width:320px" - appears first and the whole widget appears over other page content when the button is clicked.
For example, on this page, we place the plugin <script> inside a <div> tag with position:sticky like this:
<div style="position:sticky; top:65px; left:calc(50% - 180px); z-index:3001">
<script id="connexense_js" plugin_id=" ... ></script>
</div>
By placing the <script> tag in a <div> tag like this you can position the widget exactly where you want it - near the top and centered is best. If you place the <script> tag in your document.head the widget will be appended to document.body and will appear at the very top of the page.
Assistance: Connexense developer Craig is available much of the time and always eager to help :) If he's not online on this page, try placing a call to support@conn .... .com from the Connexense home page.
<div style="position:sticky; top:65px; left:calc(50% - 180px); z-index:3001">
<script id="connexense_js" plugin_id=" ... ></script>
</div>
Using the widget
Upon clicking the start button, a login appears: the website owner should log in with their connexense.com username and password; website visitors need only enter a screen-name.
The first time, the plugin will ask for camera and microphone permissions - it cannot run without. When both users are providing media streams, a two-way connection is established and the control buttons appear.
 - toggle microphone on/off
 - toggle camera on/off
 - toggle text chat show/hide
 - share a screen, window, or browser tab
 - toggle half-screen view on/off
 - toggle full-screen view on/off
- toggle microphone on/off - toggle camera on/off - toggle text chat show/hide - share a screen, window, or browser tab - toggle half-screen view on/off - toggle full-screen view on/off
Enjoy!

Keep me awake, maintaining our privacy
Site Menu
Intro, Info & Help
Create a Private Video Chat Server
Join a Private Video Call
Connexense Video Chat Community
Consequential Conversations
Connexense Private Video Messages
Connexense Video Workshop
Video Background Replacement
Live Broadcast Webinar Events
Live Webcam Broadcasting
Live Webcam Gallery
Video Chat Plugin for Websites
Next Support Webinar